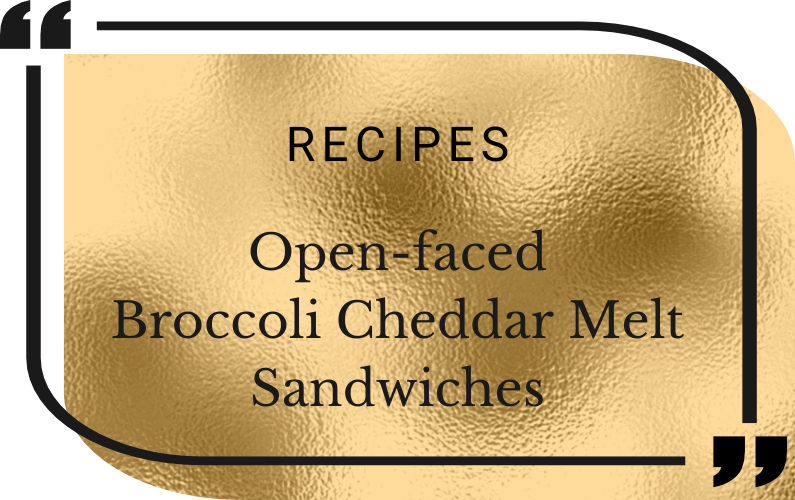
Try open-faced broccoli cheddar melt sandwiches when you need a quick lunch or supper
Open-faced broccoli cheddar melt sandwiches
My family enjoys Open-Faced Broccoli Cheddar Melt Sandwiches on those days when we don’t feel like a heavy supper but want something nutritious and… well… kinda fun to eat.
Or… if you have time to make a hot lunch, this nutritious sandwich recipe doesn’t take very long – 20 minutes tops – from washing the broccoli to pulling your sandwiches out from under the broiler.
I make these tasty sandwiches at least once a month, whenever I have a half broccoli or so that hasn’t been allocated to another dish.
Everything else in the recipe is usually in my fridge already. That’s why it’s my “go-to” supper when I don’t feel like cooking a big-production meal. Well, for me, that’s most of the time. You see why I love this recipe so much?
You can pair the sandwiches with soup, sliced tomatoes, or a bowl of fruit. If I’m not feeling too energetic, I might throw a handful of potato chips on the plate.
For a family of light eaters, two sandwich slices might be enough, especially if you heap the broccoli and cheese quite high. If you love broccoli and cheese together, I think you’ll find this dish very satisfying. It’s a favorite of ours, for sure.
Servings: 2
Prep time: 10 minutes
Cook time: 10 minutes
Ingredients:
1/2 to 2/3 head broccoli
3 cloves garlic (chopped)
2 tsp. olive oil
4 slices multi-grain bread or other “substantial” bread
6 oz. cheddar cheese (shredded)
mustard (yellow or Dijon)
salt and pepper
Instructions:
Cut broccoli into 1/2 inch pieces and rinse thoroughly
Heat oil in a skillet on medium-high heat
Add the garlic and broccoli and cook for 4-5 minutes, stirring frequently
When broccoli starts to get tender, sprinkle with salt and pepper
Add 1/4 to 1/3 cup water (depending on the amount of broccoli)
Cover and steam until water evaporates and broccoli is fork tender
Remove from heat
While the broccoli is cooking, toast the bread and grate the cheese
Spread mustard on the toast slices and place on a cookie sheet
Spoon the cooked broccoli on top of the toast slices
Cover the broccoli with (lots of) shredded cheese
Place pan under broiler and heat until the cheese is melted
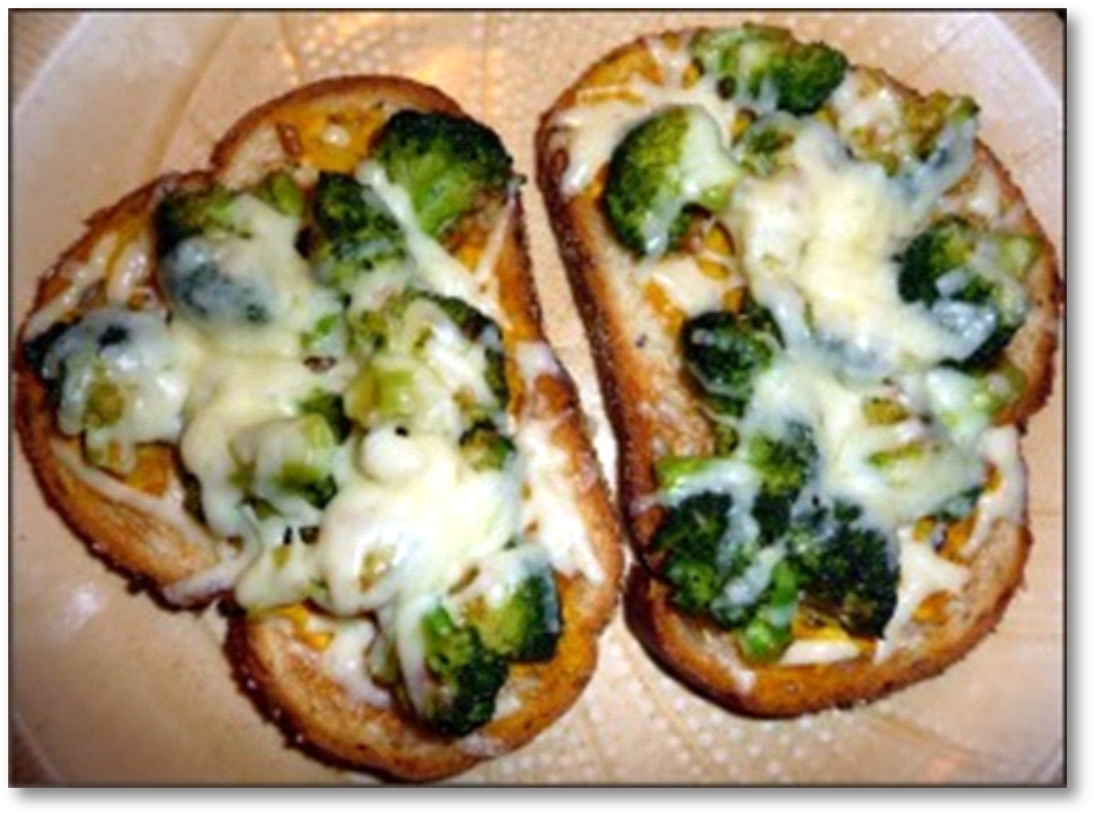
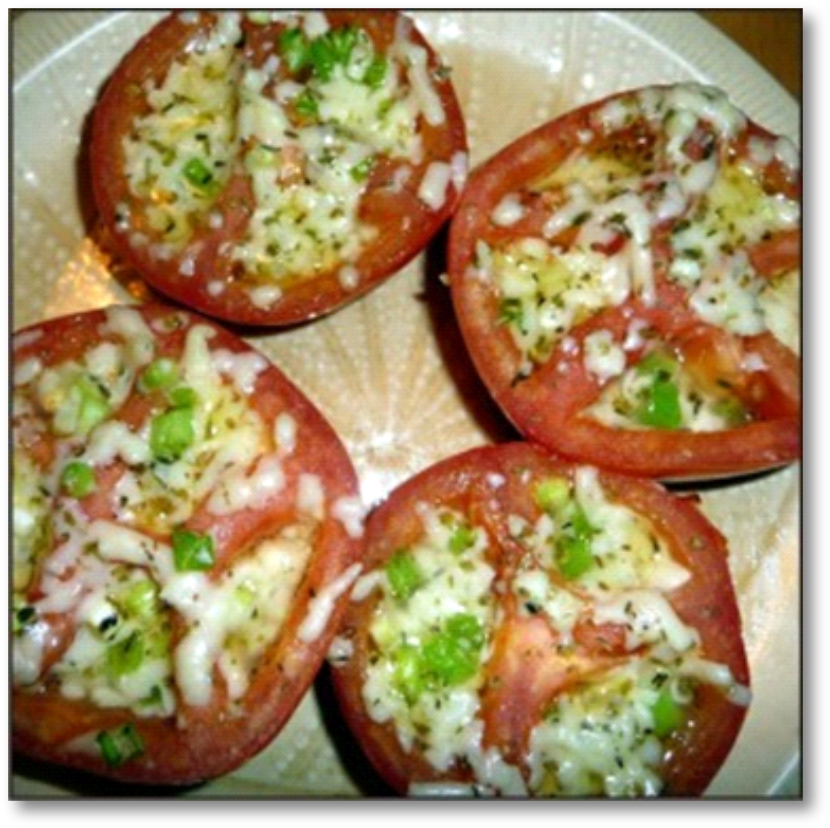
Baked herb and cheese stuffed tomatoes can be used as a vegetarian main course or easy side dish
Stuffed tomatoes – yummy side dish
This tasty baked tomato recipe can be used as a main course or a side dish, depending on the appetites of your dinner companions. I’ve served it both ways at my house.
Not long ago, it was the “veg” for my Broccoli Cheddar Melt Sandwiches. Other times, it’s been my main course, with a side of lemony green beans or garlic-parmesan cauliflower. It’s a very versatile dish, in other words.
I usually make two tomatoes, cut into 4 halves, so I use my vintage “safe” Corningware casserole dish. Then if any cheese spills over into the pan, it’s very easy to clean up afterward.
If you’ve heard Floridians complain about the flavor of tomatoes in this state, you’ll understand why some doctoring up like this is necessary. If you live in a “good tomato” area, this recipe will be a lovin’ spoonful for your palate.
I’m a klutzy cook who needs easy recipes and I’ve made this dish several times. You really can’t do it wrong… thank goodness.
Servings: 2
Prep time: 10-15 minutes
Cook time: 30-40 minutes
Ingredients:
2 ripe medium-sized tomatoes
salt and pepper
1 cup grated Cheddar cheese or other favorite cheese that melts well
1/4 cup scallions, chopped
1/2 tsp. dried oregano or dill. For fresh herbs, use 1/2 tbsp.
Instructions:
Preheat the oven to 400 degrees F.
Cut the tomatoes in half
Scoop out the seeds
Oil a casserole dish that will fit your tomato halves
Place the tomato halves in the pan sliced side up
Sprinkle with salt and pepper
Mix the grated cheese, scallions and herbs together in a small bowl
Spoon this filling into the (now seedless) tomatoes
Place foil over the baking pan
Bake for 15 minutes, covered
Remove the foil
Bake an additional 5 or 10 minutes until the cheese is melted and the insides are hot
Recipe Notes:
I use my Corningware casserole for this recipe. If any cheese spills over, it’s very easy to clean up afterward… plus it’s the perfect size for 4 tomato halves.
A tasty appetizer for TV sports events and casual parties
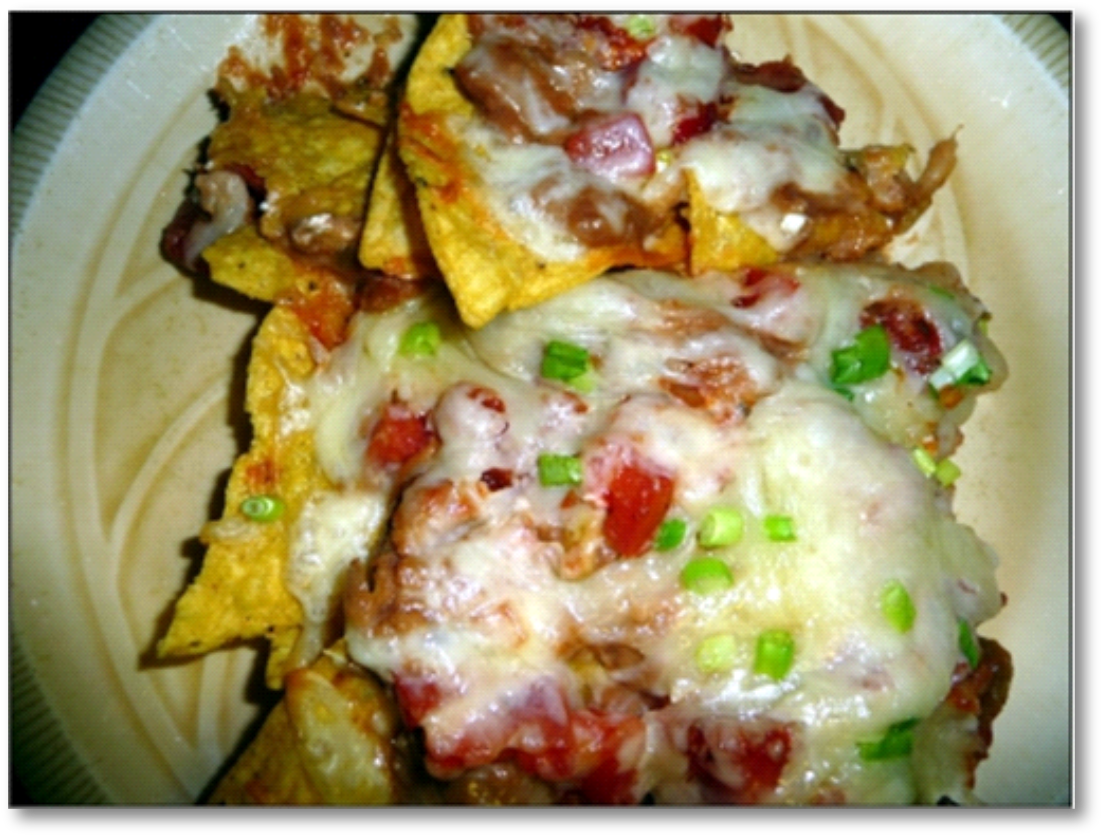
Football Sundays wouldn’t be complete without Vegetarian Nachos Grande. The recipe is super easy… just assemble the ingredients, layer them, bake and eat.
Easy to make Vegetarian Nachos Grande
If you’re inviting a gang over for a TV sporting event or putting together your Super Bowl party menu, here’s a vegetarian appetizer that your guests will gobble up with gusto: Vegetarian Nachos Grande.
In my family, this versatile dish is our favorite “football Sunday” supper. I make it at least once a month… even in the months between Super Bowl and pre-season games. it’s that good.
This recipe calls for a couple of ingredients that I don’t typically eat… but my son does, so I leave off the olives and sour cream on my 1/3 of the dish. Hope you have time to try this one… it’s not difficult to make and, after you assemble your ingredients, it only takes 15-20 minutes to bake.
In the south, there’s nothing like crispy fried okra as a side dish for summer barbecue cookouts. I live in Florida, so summer starts in March or April… and outdoor cooking takes place pretty much year-round. The growing season starts early here, too. When I came across baskets full of fresh okra at the St. Petersburg Saturday market in the spring, I decided to see if I could duplicate my southern-born hubby’s magical recipe for crispy fried okra.
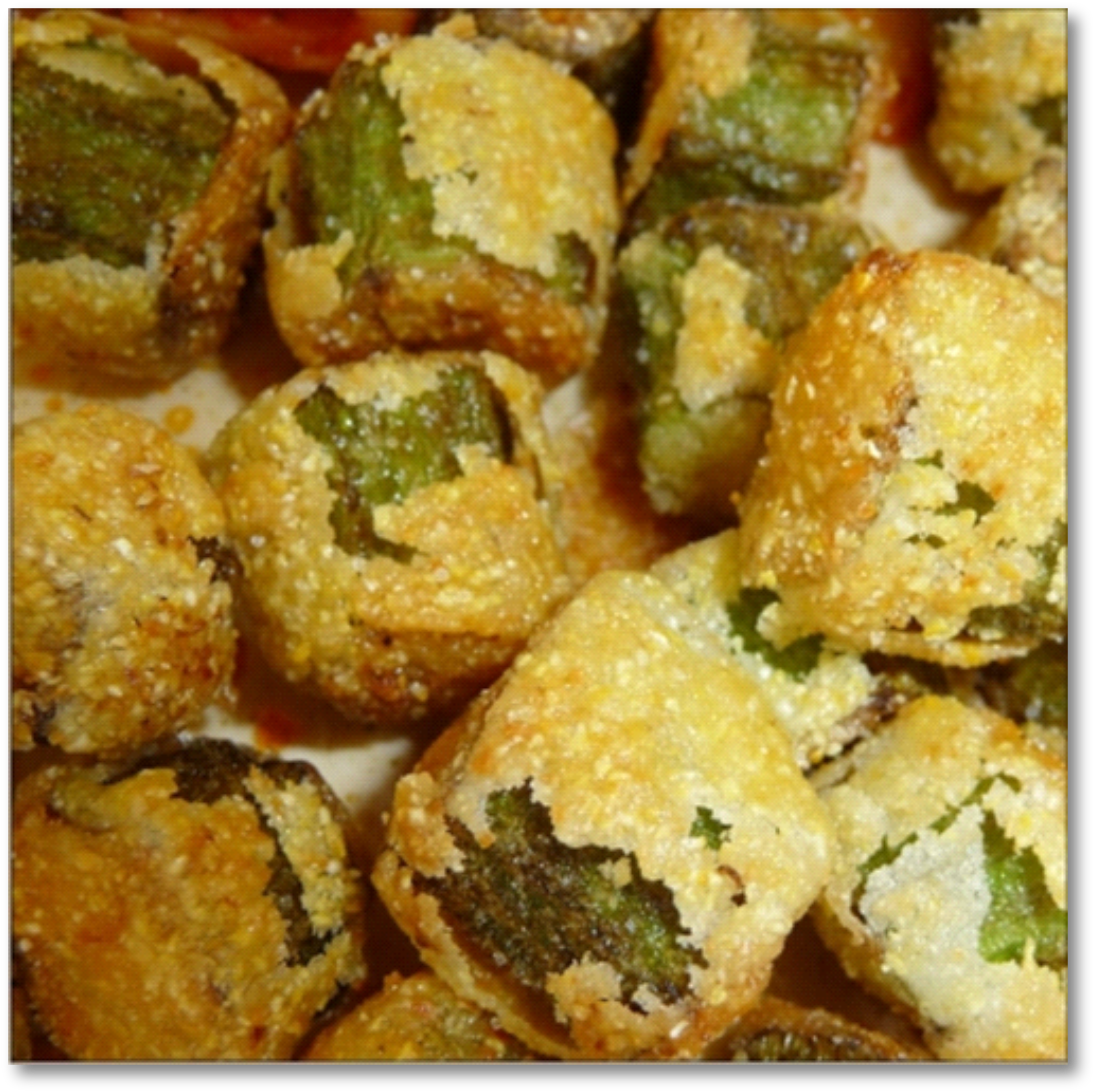
Crispy fried okra is NOT slimy
I cooked fried okra for the very first time on Sunday, April 13, 2014. My son said it tasted just like his dad’s recipe… and that made me prouder than you could ever imagine. My husband was a wonderful cook; I mostly chopped veggies.
Crispy fried okra is a favorite Southern side dish… as well as a fun finger food. This recipe was my southern hubby’s and it’s guaranteed non-slimy.
Servings: 4
Prep time: 15 minutes
Cook time: 10 minutes
Ingredients:
1 lb. okra pods… 3-inch pods are more tender
1/4 – 1/2 cup cooking oil. I used peanut oil
3/4 cup yellow cornmeal
1/4 cup all-purpose flour
salt and pepper
Crispy fried okra… no slime
Instructions:
Cut okra into pieces about 1/2 inch in length (the ends are a bit woody, so be generous in what you remove there). If any of the pods feel tough or dry when you slice into them, consider freezing those pieces for soup… they won’t be very tender as a quick-fry.
Rinse the okra well in a colander, to remove much of the “slime” (it’s actually mucilage).
Heat oil (about 1/2 inch in depth) in a large skillet.
Combine the cornmeal, flour, salt, and pepper in a paper bag or bowl.
Toss in your sliced okra a few at a time and coat evenly. Store on a plate until they’re all coated.
Using a large slotted spoon, drop the okra carefully into the hot oil. I used a 12″ frying pan, so I made mine in a single batch.
Cook until the undersides have browned lightly.
Then you can gently stir the okra pieces around in the oil, turning them over every so often for even cooking.
When they are browned on all sides, remove them from the oil with your slotted spoon and place on paper towels.
Sprinkle with salt to taste.
If you need to make more than one batch because of the size of your fry pan, add more oil to the skillet before you cook more okra.
Serve piping hot.
Frying Tip
If you use a frying pan with fairly high sides, you’re less likely to have an issue with oil splashing onto the stove. And probably won’t need a splatter screen, either.
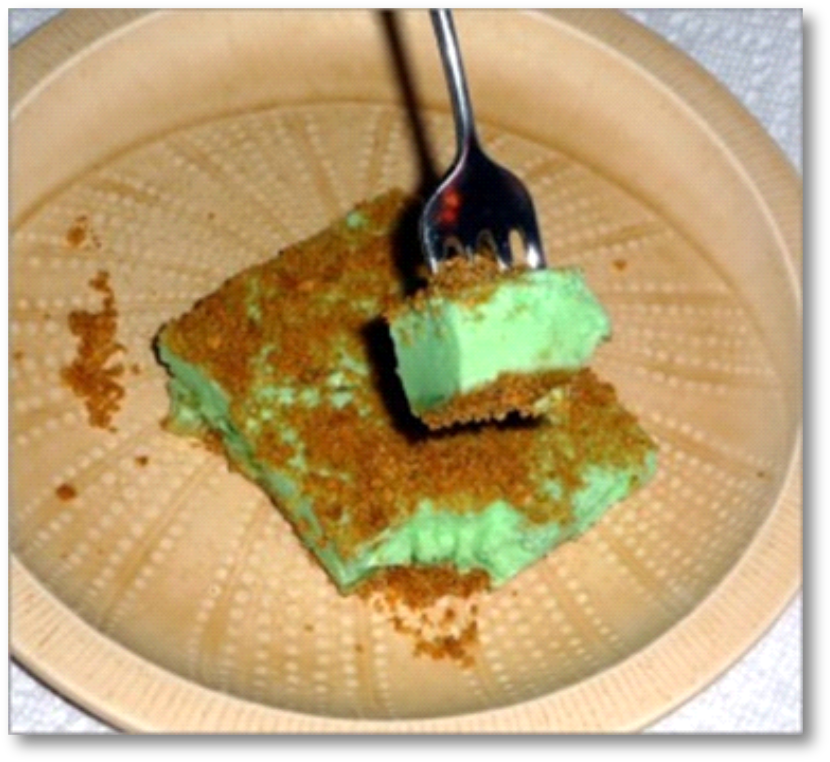
My family’s favorite holiday dessert for Thanksgiving and Christmas was a fresh-tasting pineapple lime jello confection we always called “Green Stuff”
For special occasions, my mom made a delicious dessert we called “Green Stuff.” I never knew its real name.
But I remembered that it contained lime jello, crushed pineapple, whipped cream… and marshmallows. Happily, my sister found the recipe and I learned how to make this memorable dessert in time for Christmas a few years ago.
It’s a wonderful recipe for potlucks and holiday meals. A single recipe delivers many, many servings, you see. Light and refreshing after a big meal… and feeds a multitude.
My research into the name of this wonderful no-bake confection led me down a few side roads, including someone else’s quest for a 1950s recipe that sounded very similar to my mom’s. Not one of the recipes I came across matched my mother’s, but it seems there were a lot of people who recalled a holiday treat from decades ago known as “Green Stuff.”
So here it is, the recipe that my mom probably cut out of a magazine in the 1950s or early 60s and that graced the Christmas dessert table many years running. You see, we loved this dessert so much, we always asked her to make “Green Stuff” for special meals. Let’s see if this recipe rings any bells for you. Or perhaps you’re more familiar with one of the alternatives… there are quite a few. I just couldn’t find one exactly like my mom’s.
Green Stuff was always our favorite Christmas dessert
My sister and I remember this dessert from our childhood and we’re both in our later 70s now, so that’s how long it’s been around in our family.
The first time I made this dessert, I got the flavor right but not the lightness. My second attempt came out FABULOUS.
I hope you enjoy this classic dessert as much as our family has over the years.
Green Stuff… ready for eating
Servings: 12
Prep time: 1/2 to 3/4 of an hour
Cook time: 2-3 hours (includes chill time)
Ingredients:
1 6-oz pkg (or two 3-oz pkgs) lime Jello
16 large marshmallows (cut up)
1 cup whipping cream
1 cup crushed pineapple (drained)
1/3 cup butter (melted)
1/2 cup dark brown sugar
1 to 1-1/2 cups graham cracker crumbs
Instructions:
In a large bowl dissolve 1 large box (or 2 small boxes) lime Jell-O in 2 cups boiling water (half the normal amount).
Add 16 large marshmallows (cut into pieces) while the water is hot, so the marshmallows melt completely.
Chill in the refrigerator (in the bowl) for 30 minutes, or until it has cooled enough to whip.
Grease a 9 x 13 inch pan.
While the Jell-O and marshmallow mixture cools, prepare your graham cracker mixture.
Melt 1/3 cup butter and blend in a bowl with 1/2 cup brown sugar and 1-1/2 cups graham cracker crumbs. I used a fork to incorporate these ingredients.
Put 2/3 of the graham cracker mixture on the bottom of the 9 x 13 pan. Pat it down to create a crust on the entire bottom of the pan. I did not bake or chill the graham cracker mixture before adding the other ingredients on top of it. Some recipes mention both methods.
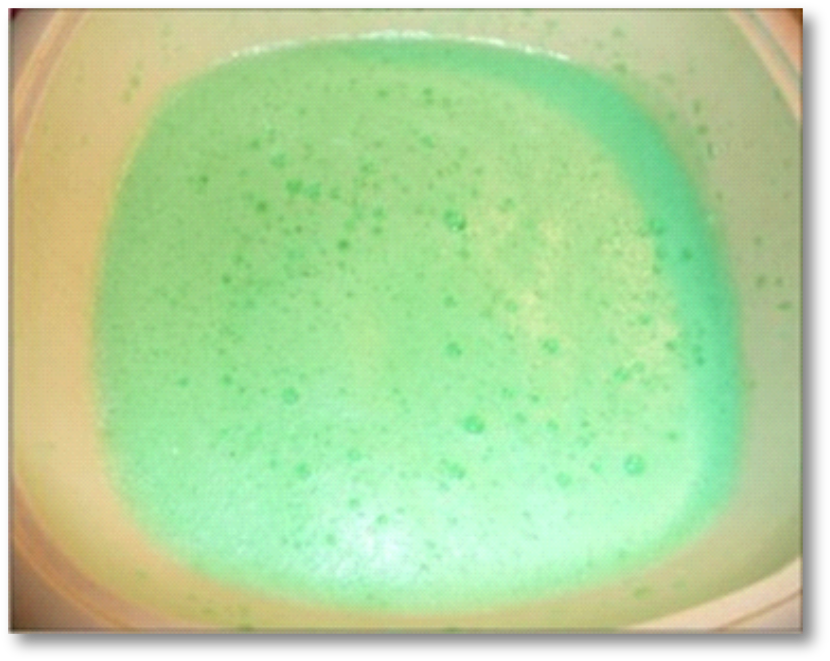
Remove the jello bowl from the fridge and whip the Jell-O and melted marshmallow mixture until it’s completely frothy. (My mom’s recipe just said, “Whip well” and the first time I made this dessert, I didn’t froth it up enough. See picture below for frothiness.)
Whip 1 cup of whipping cream to soft peaks and add to the Jell-O-marshmallow mixture. Whisk the cream in or use the blender briefly and gently to combine the ingredients.
Fold in 1 cup crushed (drained) pineapple. PLEASE NOTE: Fresh pineapple will not allow the Jell-O to set; this needs canned or cooked crushed pineapple.
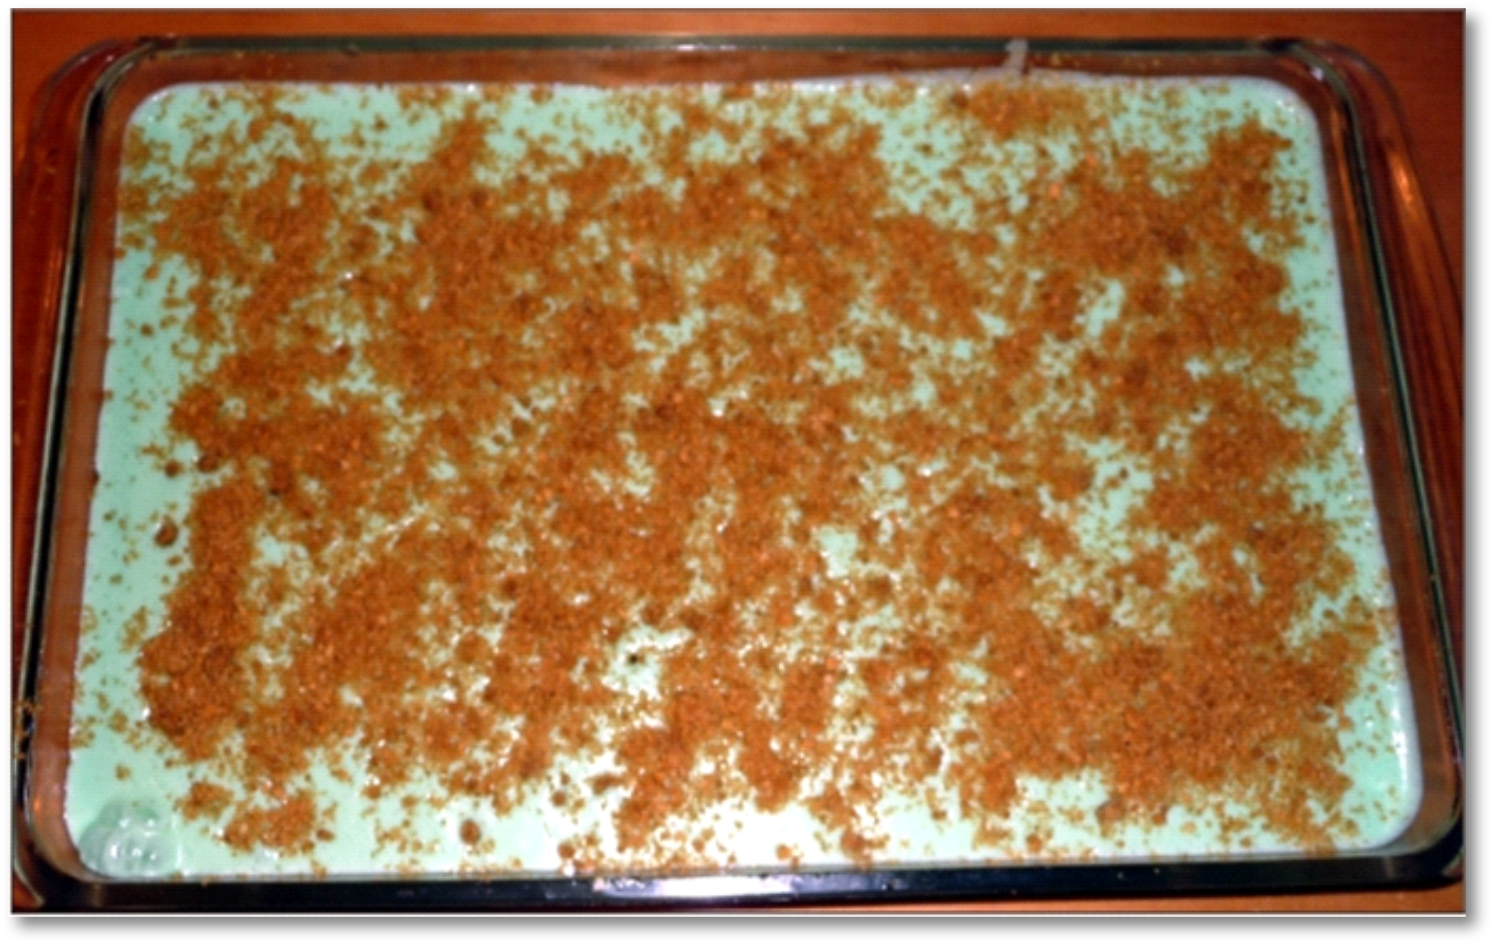
Blend well and then pour onto the graham cracker crust.
Sprinkle the rest of the graham cracker crumbs on top.
Chill a few hours or overnight before eating.
Or not. We dug in after about an hour and it was pretty well set by then, but if you want to make neat squares for serving, let it chill longer.
See the Frothy Stuff?
That’s what my mom meant by “whip well.”
These photos are a few years old… this is what “frothy” looks like
After the marshmallows are melted in the hot Jell-O, you want to cool the mixture for at least 1/2 hour.
Then whip the Jell-O and melted marshmallow mixture so it is entirely frothy, with no dark green remaining. Like in the picture here.
This step is important. On my first attempt, I didn’t get it frothy enough, so the dessert looked more like Jell-O than fluff.
When done correctly – like I did the second time – “Green Stuff” is a light, fluffy, fruity dessert, perfect for after a big Thanksgiving or Christmas dinner.
Pancake Frying Pan Reviews: Plett Pan vs. Cast Iron Skillet
My grandmother’s much-loved pancake recipes need two different fry pans.
A few years ago, I went on a frying pan quest, when pancakes became an important food group in our soft foods diet. A dental appliance put soft pancakes front and center… but I didn’t have the right kind of pancake pan for the two types of pancake recipes I wanted to make.
So I checked the frying pan reviews on Amazon and ordered what I thought would be the perfect frying pans for both the 3-inch Swedish pancakes and the baked Pannukakku – Finland’s traditional oven pancake.
I had one hit… and one miss (sort of). HINT: You can see evidence of the scratches I made in my brand new Swedish pancake pan in the photo below. Let me tell you about my adventures in pancake pan land.
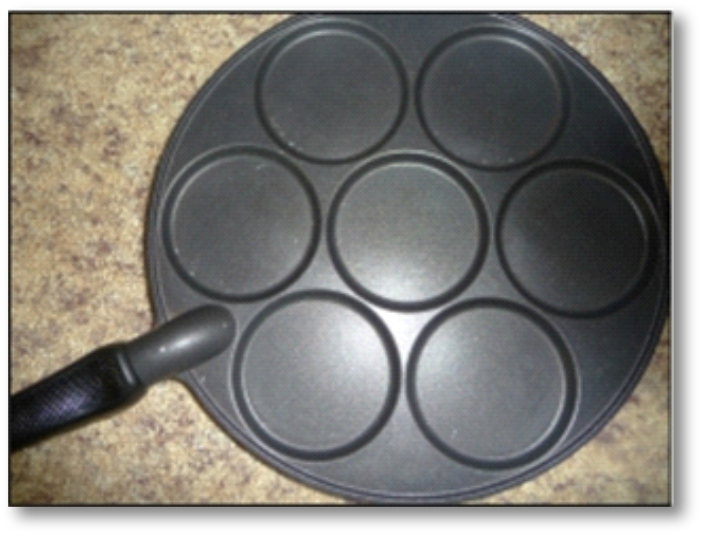
My review of the Plett pan – Nordic Ware’s Scandinavian Silver Dollar Pancake Pan
My new Nordic Ware pancake pan… slightly scratched by me
I bought this pan to cook Swedish pancakes
When I was a kid, my grandmother, my mother… and then my sister and I… loved to cook and eat plates full of the small 3″ Swedish pancakes. I always thought they were a Finnish delicacy, since my grandparents came from Finland, but I later learned they were actually called “Swedish” pancakes.
When my son needed to eat a soft foods diet for a month, I found a box of Lund’s Swedish Pancake Mix that tasted very close to the pancakes we ate at home, all those years ago. But when I dropped batter from a tablespoon into my regular non-stick frying pan, the pancakes kind of spread out in ungainly shapes and I just kept wishing I had my mom’s old Swedish pancake pan. It looks like the one in the photo here (it’s the pancake pan I purchased from Amazon). But hers and my grandma’s were cast iron and my sister got my mom’s pancake pan after she passed.
Because I was making these soft, silky pancakes a couple of times a week during the soft foods diet, I really wanted the right kind of pan, so I took myself (digitally) off to Amazon and started reading the reviews.
There were actually 4 Swedish pancake pans available at the time – they’re also called “Plett” pans. But one was way too expensive and another had a 2-star review. So I narrowed my choice to the other two.
I chose the Nordic Ware lighter weight pan over the cast iron Plett pan because of the Amazon reviews. They were far more positive than those of the cast iron Plett pan available at that time.
Here’s my review of the Nordic Ware Pancake Pan: It’s okay.
I wouldn’t rave about it, but it does cook the pancakes just fine. What gave me a problem was… the “care and use” instructions were hidden on the inside of the cardboard cover thingy, in very small print. The part I missed said, “Flip each pancake with a non-metal utensil… we recommend wooden skewers or chopsticks, a small silicone spatula or a plastic fork for flipping.” If you follow these instructions (like I didn’t), you’ll have a pretty good Swedish pancake pan with a 10-year warranty.
Mine, on the other hand, is already scratched. It’s my own fault… but it would cause me to give Nordic Ware a less kind review than if they had put their instructions where I could have seen them more easily.
The only other issue I had with the pan was a slightly loose handle, but I was able to tighten it easily with my screwdriver.
I have not purchased the Norpro cast iron plett pan that Amazon sells because its reviews were less than stellar. I thought about it, because it’s cast iron, which is what I’m used to cooking Swedish pancakes in. But, for now, I’ll stick with the one that works
And now for the rave review!
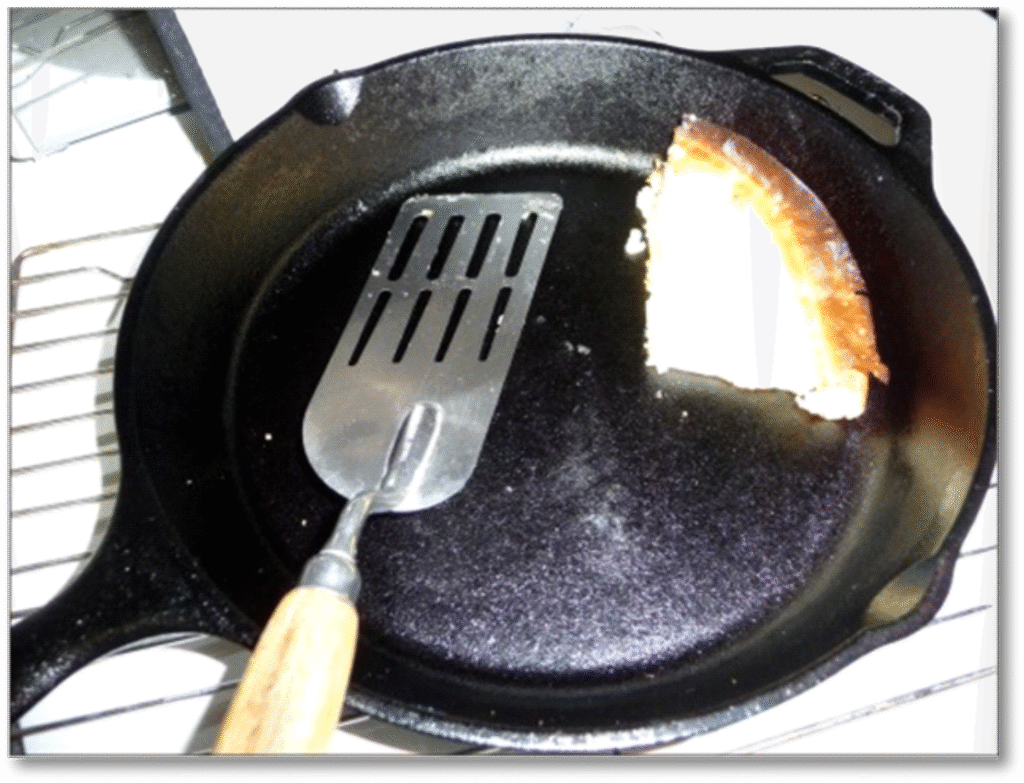
The Panukakku pancake didn’t stick to my Lodge cast iron frying pan
My new Lodge 10-1/4 inch cast iron frying pan came the same day as the Nordic Ware Swedish pancake pan. I bought the cast iron pan in that size because that’s what my recipe card for Pannukakku – Finnish oven pancakes – said to use. And I didn’t have one.
If you’ve ever researched cast iron cookware before, you might have noticed the rave reviews given to the Lodge product line. From my experience so far… these reviews are well justified.
I followed the recipe on my card exactly as written and was so happy with the result that I immediately made a special Pannukakku page dedicated to the recipe and this page you’re reading extolling the virtues of Lodge for cast iron cookware.
My new cast iron pan came pre-seasoned. Many of the Amazon reviews said to scrub off the pre-seasoning and re-season with a variety of different methods, depending on whose review you read. I took Lodge at their word and left the “store-boughten” seasoning on. You can see from the photo above that my pancake batter didn’t stick one little bit. The recipe is primarily an egg, flour and milk batter baked in the oven; my expectation was that something would be stuck on afterward. But it came out clean as a whistle.
All I had to do was wash the pan in hot water, paper towel dry and wipe another paper towel around the inside with a bit of canola oil on it. The Lodge instructions for use were a lot easier to find, too.
I hope my two pancake frying pan reviews help you with your own decision-making when it comes to pancake cookery. If you try my grandmother’s two pancake recipes, you’ll understand why the right choice was so important.
My grandmother’s Swedish pancakes recipe brings back so many memories of my childhood
As a youngster, I always called them Finnish pancakes, because my grandparents came from Finland… and our family made these pancakes a lot. This recipe was my grandmother’s originally.
What brought this childhood favorite back to mind was a need we had awhile back for a soft foods diet and I happened across a box of Lunds Swedish Pancake Mix on Amazon. We tried it – and it was really good, almost as good as the pancakes my sister and I used to make when we were kids.
My grandmother used syrup or strawberries, rather than lingonberries on her pancakes, so that part of the Swedish Pancake tradition passed us by (probably because we weren’t Swedish).
These pancakes are easy to make from scratch. My sister and I were in middle school when we learned to make them. And how we loved these little treats for breakfast (or lunch, or supper).
Here’s our family recipe, if you’d like to give them a try.
My Nordic Ware pancake pan makes seven 3-inch pancakes
Servings: 2-4
Prep time: 5 minutes
Cook time: Approximately 3 minutes (per batch)
Ingredients:
3 eggs
1-1/4 cups milk
3/4 cup all-purpose flour
1 tbsp. sugar
pinch salt if desired
Instructions:
Beat the eggs with a whisk or fork
Stir in milk
Add flour, sugar and salt, mixing until smooth (batter is quite thin)
Heat frying pan to medium (or medium-high) heat
Lightly butter the pan so batter does not stick
Drop in a tablespoon of batter for each pancake. (A Plett pan works best for making even-sized pancakes.)
Brown each pancake lightly on both sides
Keep pancake batches warm in the oven or serve immediately (I do the latter… my family can’t wait)
Pannukakku – the traditional Finnish Oven Pancake – was my Grandmother’s version of comfort food
My grandmother, whose recipe this is
Finnish pancakes are the main comfort foods I remember from my childhood. Actually, it was pancakes and Finnish cardamom coffee bread, but I never did get my grandmother’s recipe for pulla (coffee bread). I do, however, have Mummu’s recipe for Pannukakku, also known as Kropsua, which I will share with you below.
If you’ve never made Pannukakku, you’re in for a treat. This is a custardy pancake that contains ingredients you probably already have in your kitchen, takes very little time to prepare, and bakes in the oven while you go do something else. My kind of cooking.
Pannukakku is a very adaptable dish. I’ve had this pancake for breakfast, dessert and even as the main course for lunch or supper. It is versatile, delicious and… I guess you could say… soothing. It reminds me of my grandmother… and childhood. Christmas, too. That’s when my mom would make Kropsua… on Christmas morning. Finnish oven pancakes are rich and filling – a little heavy for summer fare – but they are perfect for chilly fall and winter days.
I hope you have a chance to try my Pannukakku/Kropsua recipe and get a taste of this traditional Finnish comfort food for yourself. Who knows, it might even become one of your own family traditions.
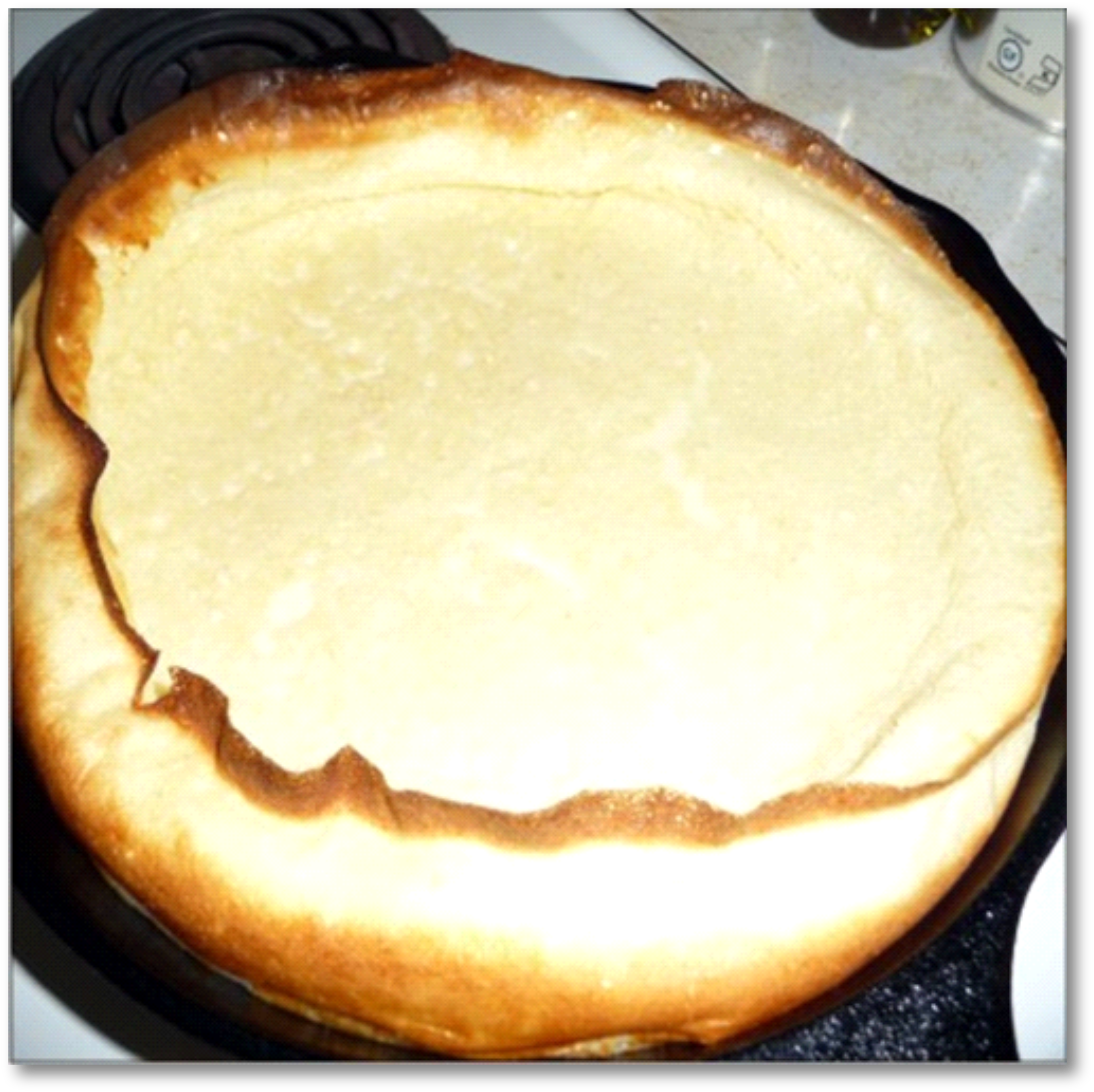
My new cast iron skillet worked perfectly for my oven pancake
The week I wanted to try making Pannukakku for the first time in many years, I received two frying pans from Amazon. One was a Plett pan for the small Swedish pancakes, which I’ve reviewed on another page. The other was this 10 1/4 inch pre-seasoned cast iron skillet from Lodge. This was my first purchase of a Lodge product and now I see why they get such great reviews.
Nothing stuck to my Lodge Logic Skillet
How to make Finnish oven pancakes
3 things to be aware of:
(1) Where it says to “whisk” in the flour after using the electric mixer… use a whisk, not the mixer.
(2) Be careful how you pour the batter into the frying pan. The pan is hot and some of the batter could stick on the sides if you don’t pour carefully.
(3) When you place the pan in the oven (middle rack), try not to tip it too much. It’ll send the batter up the sides and you’ll have a lop-sided pancake, like I did.
A little lop-sided… but it tasted great
Servings: 4
Prep time: 10 minutes
Cook time: 20 minutes
Ingredients
3 eggs
1/4 cup sugar
1/4 tsp salt
2 cups milk
1 cup unsifted flour
1 tsp vegetable oil
1 tsp vanilla (optional)
Instructions
Preheat oven to 425 degrees.
Place well-seasoned 9-10″ cast iron skillet in preheated oven for 10 minutes.
With electric mixer, beat together eggs, sugar and salt in large bowl.
Beat in milk and (optional) vanilla.
Gradually whisk in flour until batter is smooth and well-blended.
Using a potholder, remove preheated skillet from oven and brush with oil.
Pour in batter.
Bake in preheated 425 degree oven for 20 minutes or until puffed and golden.
Remove to wire rack and let stand for 10 minutes. (The pancake will flatten a little.)
Serve with sugared strawberries or fruit preserves.
This recipe was made for holiday gift-giving, though it’s delicious any time of the year
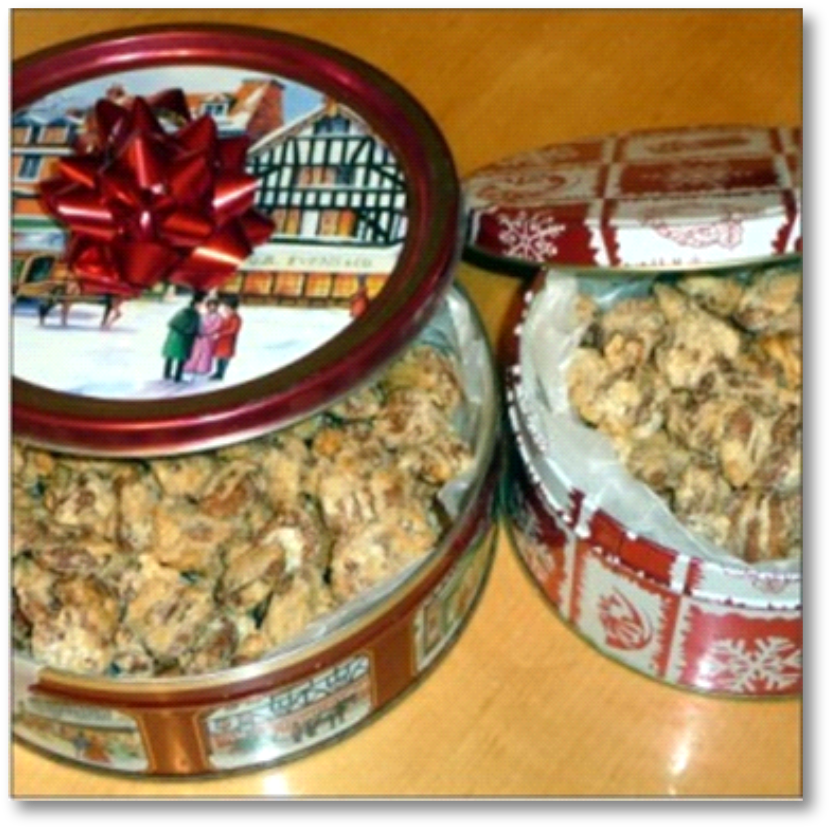
Swedish Nuts Ready for Gift-Giving
If you’re looking for an inexpensive gift to give your family, friends, neighbors or office colleagues, here is a treat that is (a) homemade, (b) delicious and (c) inexpensive to make.
I’m talking about Swedish Nuts – pecans in this case – but any nuts will do.
For a minimal cost, you can create a whopping mound of glazed nuts for your potlucks and get-togethers. The same recipe will make 3 or 4 small cookie tins of yummy sugar-coated pecans (walnuts, almonds, mixed nuts) with the very easy-to-follow recipe that you’ll see below.
I am not much of a cook, but I had these nuts for the first time a few Christmases ago and was hooked – very hooked. These Swedish Pecans are so tasty that you’ll have to make a batch for gifts and another batch for the house.
Awhile back our housemate made Swedish Nuts for the first time… and probably every weekend from Halloween to Christmas. We really love these nuts.
Because these nuts were such a big hit at home, I decided to try my hand at making Swedish Nuts to give my neighbors and lawn guy a nice, inexpensive gift for the holidays. My budget was a little tighter then and I wanted to see how many tries it would take me to get this recipe down pat.
Well, the recipe I’m about to share with you is one of those “what you see is what you get” recipes. I followed it precisely… and it came out precisely right. I was, quite frankly, amazed – and tremendously pleased.
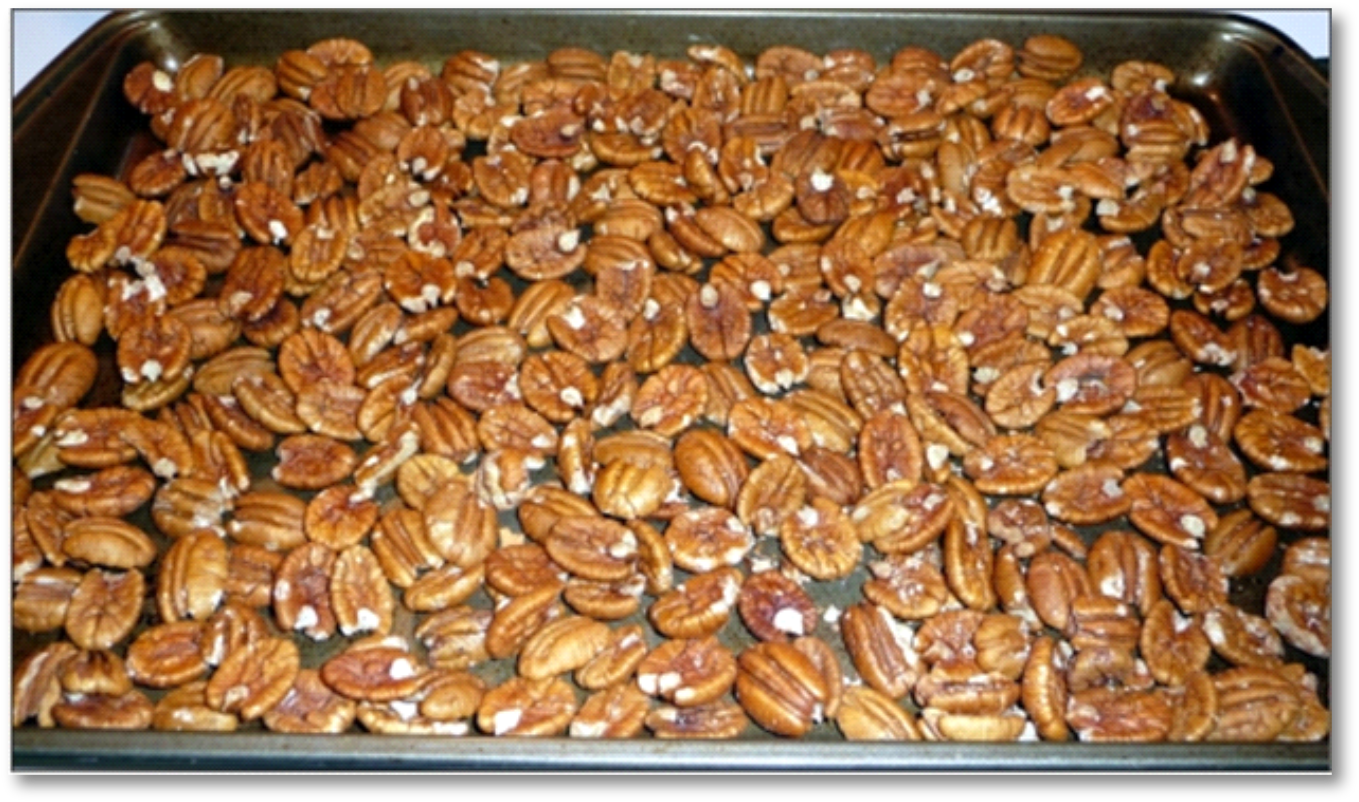
Start with fresh, good quality nuts
If you use roasted nuts, you can omit the first step in the recipe. I personally love using pecans for this recipe, but I’ve had almonds, too, and they make a very tasty Swedish Nuts treat. Once you get the first batch down, try adding 1/2 tsp vanilla extract and/or 3/4 tsp cinnamon. I used organic Florida Crystals sugar, which is not quite white. Your end product will look a little different than mine if you use refined white sugar. My recipe calls for beating the egg whites to a soft peak. Other recipes call for a stiff peak, either before or after adding the sugar.
Place nuts on a 10 x 15 (or larger) cookie sheet or jellyroll pan. Bake for 10 minutes.
While the nuts toast, beat egg whites in a medium bowl until soft peaks form.
Gradually beat in the sugar and salt.
Remove nuts from oven after 10 minutes and cool a little on a different plate (I used my other cookie sheet for this).
Slice the butter onto your baking pan and melt in the preheated oven.
Fold the toasted nuts into the egg white mixture, coating the nuts evenly.
Arrange the coated nuts in a single layer on the hot buttered pan.
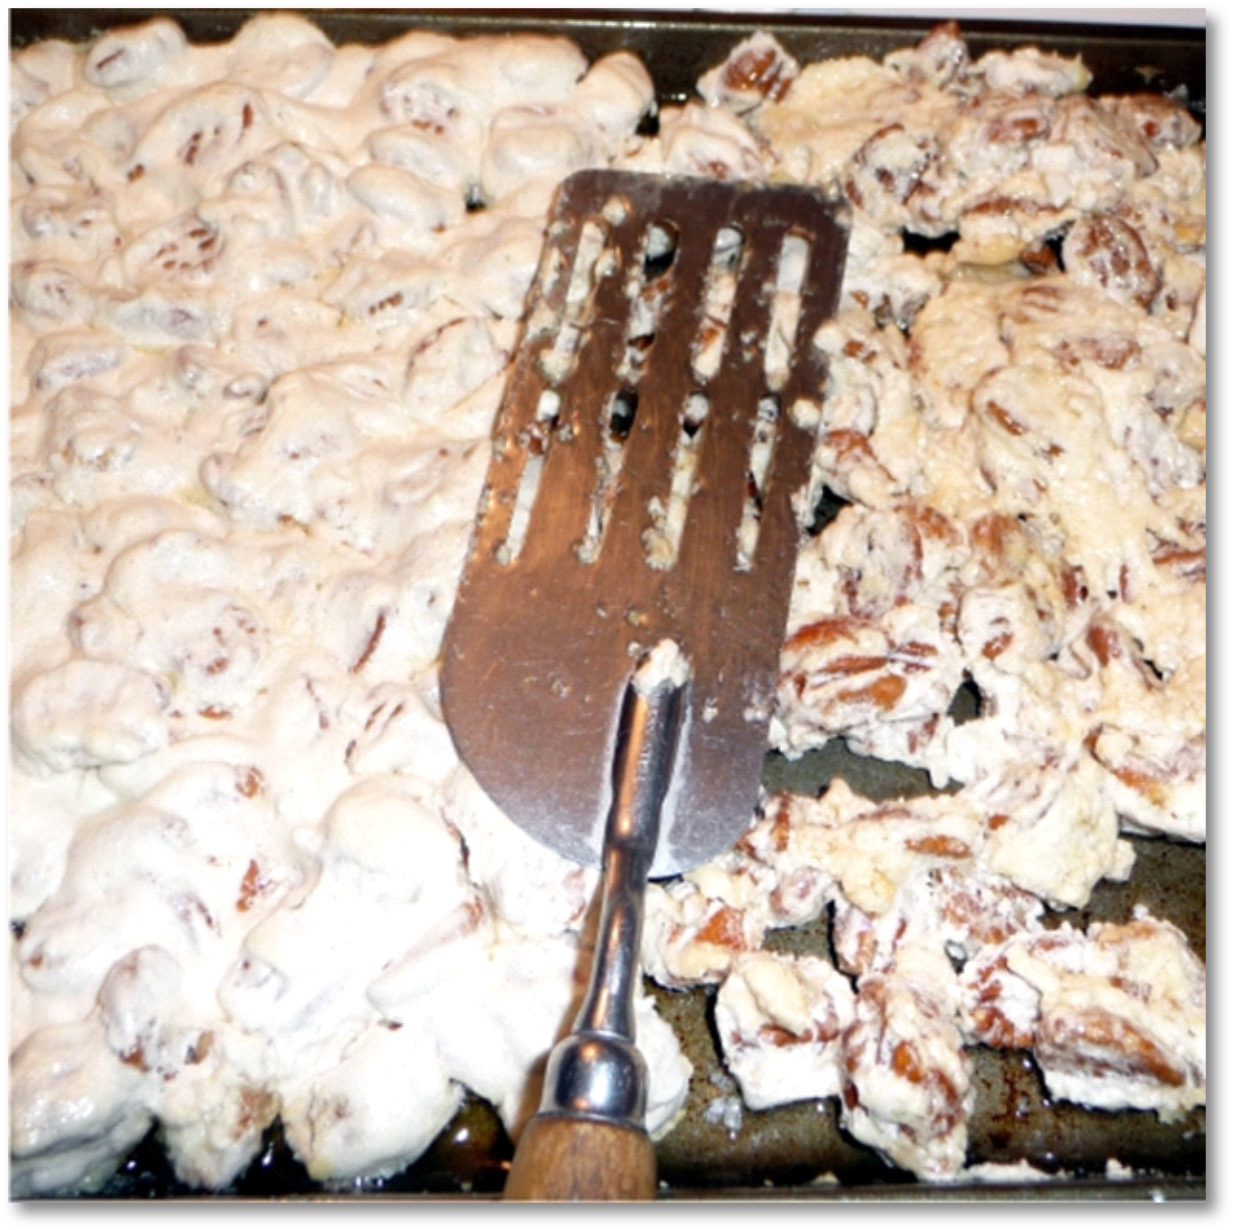
Bake for 30 minutes in the 325 degree oven. Turn the nuts with a spatula every 8-10 minutes, making sure they all get into the melted butter.
At 30 minutes, your nuts should be a nice golden color and crispy on the outside. Don’t worry if they seem soft when you test a hot one. They firm up while cooling.
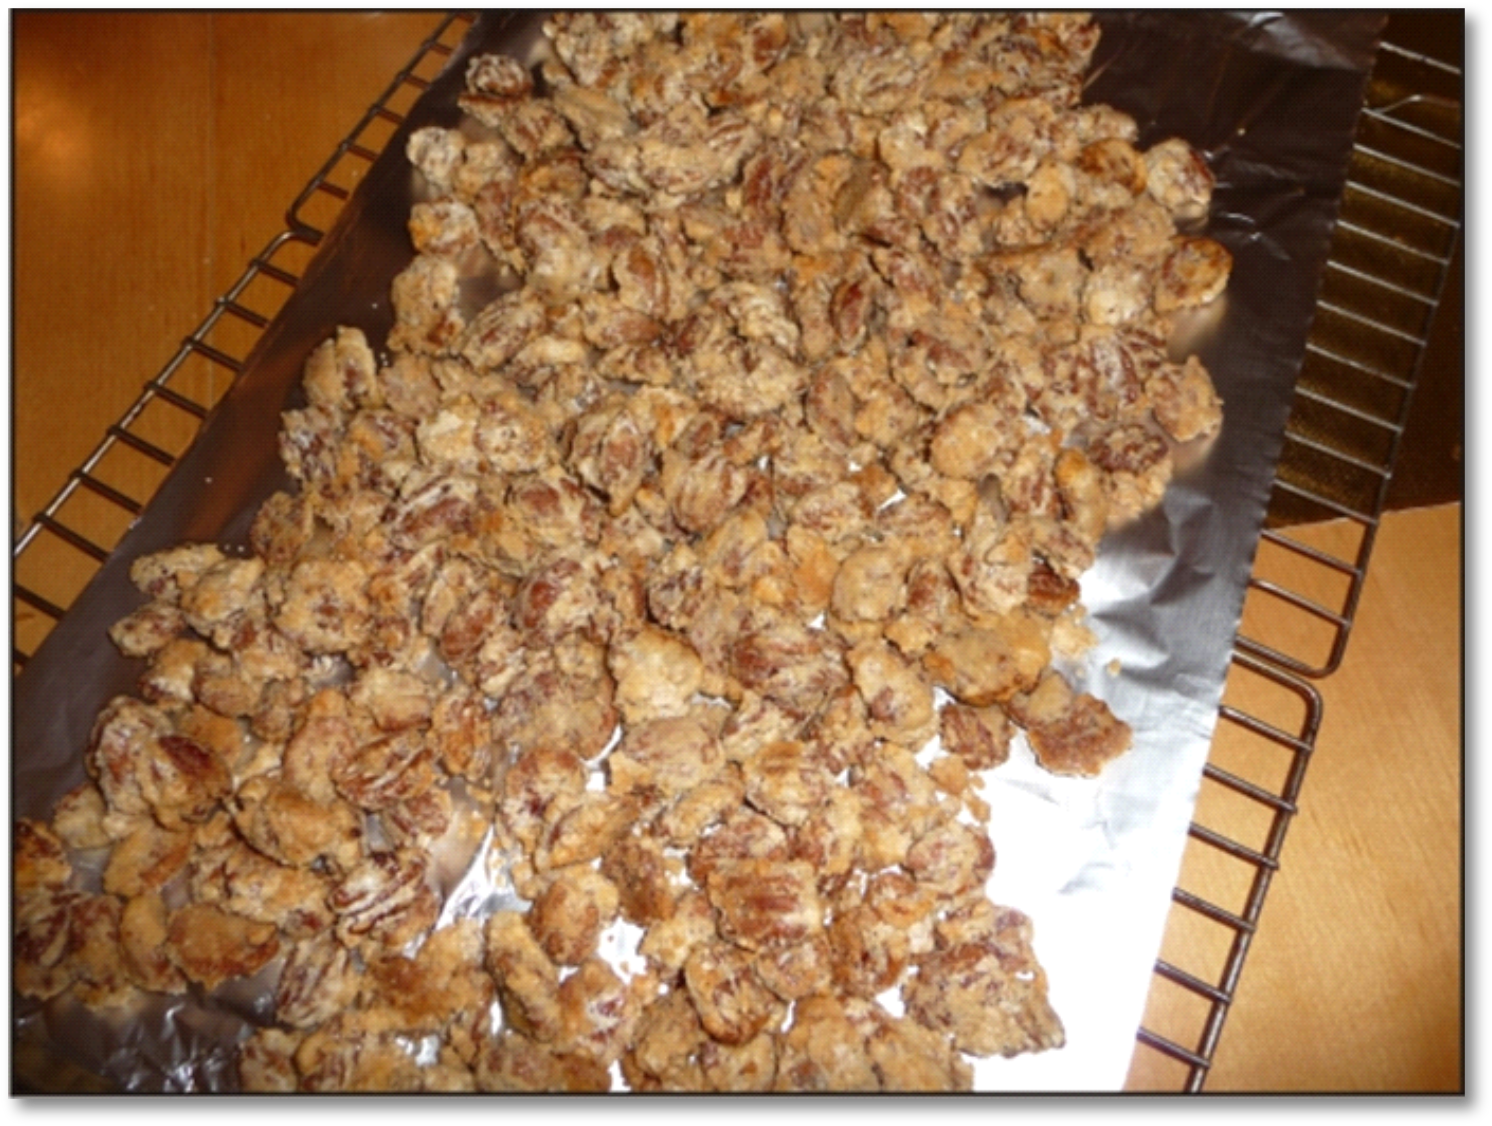
Place on aluminum foil to cool (I used two cooling racks with foil on top).
Test a few (try and stop me). When cooled, store in airtight containers.
Turning the coated nuts overYummy nuts cooling… almost ready to eat and/or store in a tin
For holiday gift giving, Amazon has a variety of Christmas-themed cookie tins. Choose your price, size and design, watching for the 4-star reviews or higher to ensure the tightness of the lids… and the freshness of your nuts.
As an Amazon associate and Clarke Courses affiliate, I earn a fee from qualifying purchases. My Senior Side Hustle is designing for a print on demand site called Zazzle. I receive a royalty on my designs when you click a link to purchase on Zazzle.com. Thanks for visiting… I hope you found the info on my website helpful. –Barbara


